

In this tutorial, you will learn how to blur a face in Snapseed using a built-in tool without blurring the entire photo. I will also compare several techniques and other Snapseed tools to see which ones are suitable for blurring a face. Finally, I will cover some common problems you may encounter when blurring a face.
Does Snapseed Have a Face Blur Tool?
No, Snapseed does not have a dedicated face blur tool. Instead, you can use the Motion Blur tool to blur a face without blurring the entire photo.
There is also a Lens Blur tool, but it does not allow you to isolate the subject or select a specific area of the image, such as a face.
How to Blur a Face in Snapseed
If you don’t have the app, download it first from the Google Play Store or Apple App Store. Then open Snapseed.
You will see an interface with a large green button at the bottom labeled Add Photo. Tap it and select the photo where you want to blur a face.
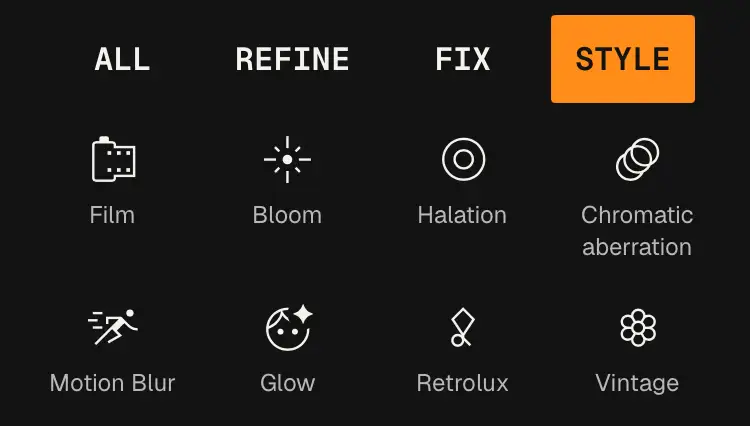
Now you are in the photo editor. Tap Tools in the bottom menu, then select Style and Motion Blur.
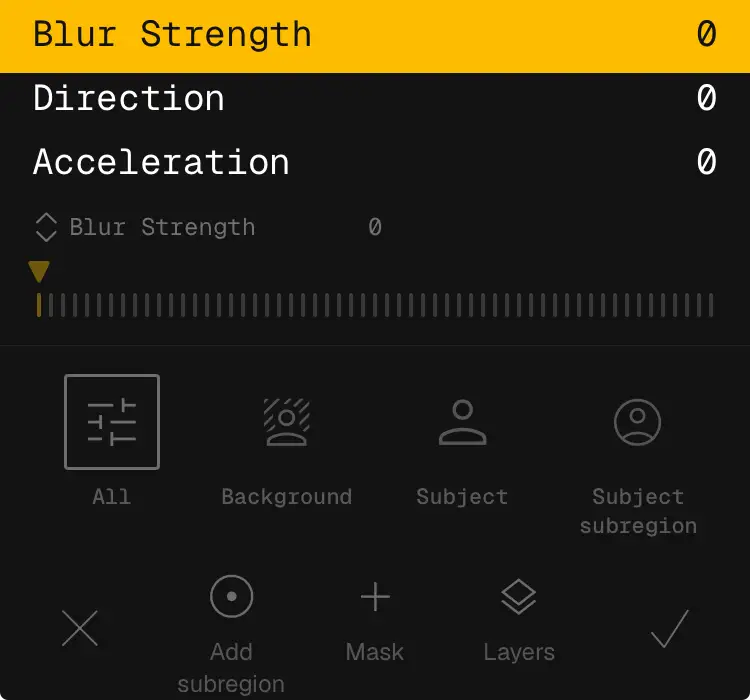
You will now see several options at the bottom: Background, Subject, Subject Subregion, Add Subregion, Mask, and Layers. Below the photo, you will see another menu with three options: Blur Strength, Direction, and Acceleration. Use the slider below these options to adjust each setting.
Selecting the Area to Blur
Snapseed gives you several ways to choose the area where you want to apply the face blur. You can use Subject, Subject Subregion, Add Subregion, or Mask.
You can start with Subject to see how much of the image Snapseed automatically identifies as the subject. However, I personally prefer Subject Subregion, as it gives you more control over the area you want to blur.
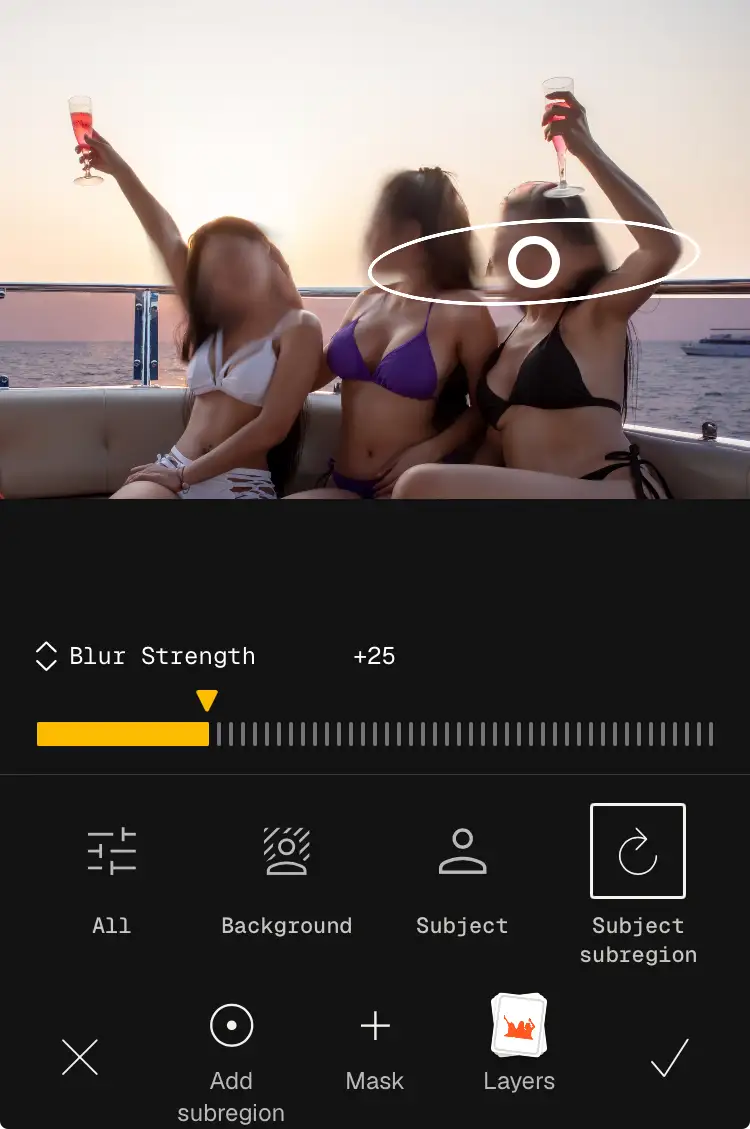
Alternatively, tap Mask to manually draw the area you want to blur. This can be useful when you want to target the face more precisely.
Keep in mind that the automatic selection may not always be accurate. Snapseed may select too much or too little of the area you want to blur. In this case, you can adjust the mask manually.
To make these adjustments, tap Layers, select the layer you want to edit and tap on the right icon with hamburger menu.. You can then use Minus to remove unwanted parts of the mask by drawing over the areas you want to exclude.
Motion Blur vs. Other Ways
Motion Blur is not the only way to hide a face in Snapseed. I tested several other tools to see whether they can be used for this purpose and how their results compare.
Snapseed tool | Can you target the face? | Result | My take |
Motion Blur | Yes | Blurred face | Best option |
Selective | Yes, with multiple points | Reduced detail, but not a true blur | Works, but is more complicated |
Lens Blur | No | Blurred background | Not suitable for blurring a specific face |
Healing | Partly | Stamp-like patches | Not suitable for a natural face blur |
Brush, Exposure | Yes | Darkened or lightened face | Useful for hiding a face, but not a blur |
Brush, Dodge & Burn | Yes | Darkened face | Can obscure facial details, but the result is not a blur |
Selective
The Selective tool can also be used to hide a face, although it takes more work. You can place several selective points over the face and reduce the Structure setting to -100. By adding multiple points, you can cover a larger area. The main disadvantage is that you need to position and adjust several points manually. The result also looks more like reduced detail than an actual blur.
Lens Blur
Lens Blur is not a good option if you want to blur a specific face. It is designed mainly to create a blurred background effect and does not give you the same masking options as Motion Blur.
Healing
The Healing tool is another possible workaround, but it works differently. Instead of blurring the face, it replaces parts of the image using surrounding pixels. The result can look similar to a stamp or clone effect in Photoshop. For this reason, I would not use Healing if the goal is simply to anonymize a face with a natural-looking blur.
Brush
You can also use the Brush tool to reduce the exposure over a face. This can make the facial features less visible, but the result is a darkened face rather than a blurred one. Dodge & Burn can produce a similar effect by darkening the face until the facial details are difficult to see. However, this is more of a visual cover-up than a blur, so it is not the best choice if you specifically want a blurred face.


Snapseed Face Blur for Privacy
Blurring a face can be useful when you want to share a photo without revealing someone’s identity. This can be especially useful for travel and street photography, where other people often appear in the background of your photos.
If you are using face blur for privacy, make sure the entire face is covered. A very subtle blur may still leave enough facial details visible to recognize the person.
Snapseed’s Motion Blur tool works well for this because you can control which part of the image receives the effect. You can also use the Mask option when you need more precise control over the face.
For casual photo editing, this can be a simple alternative to using a separate face-blurring app.
Common Snapseed Face Blur Problems
Blurring a face in Snapseed is fairly straightforward, but selecting the exact area can sometimes be tricky. Here are some common problems you may encounter.
The Mask Covers Too Much of the Image
The most common problem is that the mask does not stay exactly on the face. It may extend into the hair, background, clothing, or other parts of the photo.
This happened to me when I was testing the Motion Blur tool. The automatic selection covered more of the image than I wanted, so I had to manually remove the unwanted areas from the mask.
To fix this, open the Motion Blur layer under Layers and select the layer you want to edit. Then with Minus to remove parts of the mask that should not be blurred.
The Mask Does Not Cover the Entire Face
The opposite can also happen. Snapseed may leave parts of the face outside the selected area.
Check the edges of the mask and add more of the face manually if necessary. Make sure areas such as the eyes, nose, and mouth are covered if your goal is to make the person unrecognizable.
The Blur Is Too Weak
A light blur may not hide facial features enough. Increase the Blur Strength until the face is no longer easily recognizable. You can also apply the blur once and then apply it again.
The Wrong Area Is Selected
Automatic subject detection does not always select exactly what you need. If Snapseed selects another part of the image or includes too much of the subject, try Subject Subregion or use Mask for more precise control.
Final Words
Blurring a face in Snapseed is a fairly easy process once you know which tool to use. Motion Blur is probably the quickest option, especially when you use the masking features to target only the face.
I also found it easier and quicker to use than some other selective edits in Snapseed, such as teeth whitening. If you want to learn how to whiten teeth in Snapseed, you can check out my other tutorial as well.
How to remove unwanted objects in Snapseed
How to whiten teeth in Snapseed
How to Create Your Own Snapseed QR Code Preset
How to Use the Snapseed Double Exposure Tool
Image Source: Adobe Stock
Sources: